iOS
Testmunk iOS enables you to write automated functional testcases that you can run on various iOS devices with different OS versions. Our goal is that you are able to reduce your manual testing time tremendeously. Following the installation you will be able to write testcases and let them run locally on your simulator and iOS device as well as on a variety of iOS devices over the cloud in the testmunk device lab.
Installation
This section will guide you on how to prepare your environment and Xcode project for running Calabash tests on iOS apps locally, and deploy them to testmunk for testing on multiple devices. For this tutorial, we recommend you use our sample app project (just clone the repository or download the ZIP file).
Hint
Calabash is a framework that allows you to write automated mobile application tests for iOS and Android. It provides APIs for mimicking input to the devices, and reading its output.
What is calabash?
Prerequisites
You must be using a machine with Mac OS X. This machine must also have Xcode with its command line tools, and Ruby installed.
Hint
Download Xcode from here. Once you have Xcode installed, run this command in Terminal to install the command-line tools:
$ xcode-select --install
How do I install Xcode and its command line tools?
Hint
Your machine must have at least version 1.8.7 for Ruby to ensure compatibility for the gems we will install in the next section. By default, your Mac OS X 10.8 installation comes with Ruby 1.8.7 installed. You can check your version by running ruby -v in Terminal. If you still need to upgrade, you can try the following steps:
- Start Terminal. This can be found in the Applications folder -> Utilities folder.
- Check if you have RVM. This can be done by typing
rvminto the Terminal and pressing Enter. - If you do not have RVM, install RVM using the following command in Terminal:
curl -L get.rvm.io | bash -s - If you have RVM, install a newer version of Ruby using the following command:
rvm install 1.9.3. - Once Ruby is installed, you can verify the update using
ruby -vin Terminal.
How do I install Ruby?
Install Calabash gem
In order to get started with testmunk, you need to install the calabash gem. Simply open your terminal window and execute:
$ gem install calabash-cucumber
In case you don’t have the right permissions, please execute:
$ sudo gem install calabash-cucumber
Danger
If you get an error that reads ...can't find header files for ruby at /System/..., that means you do not have the Xcode command-line tools correctly installed. Make sure you have Xcode installed (or download it here) and then run this command in Terminal:
$ xcode-select --install
Header files can’t be found
Danger
If you are getting an error that says “clang: error: unknown argument: ‘-multiply_definedsuppress’”, you must run these 2 commands instead:
$ sudo -i

$ ARCHFLAGS=-Wno-error=unused-command-line-argument-hard-error-in-future gem install calabash-cucumber
This error is due to deprecated arguments for the clang executable that gem calls when installing certain extensions.
‘clang error’
Installing framework in Xcode project
Creating a new build target
- Open the testmunk sample project in Xcode.
- Select your project (from the File Navigator).
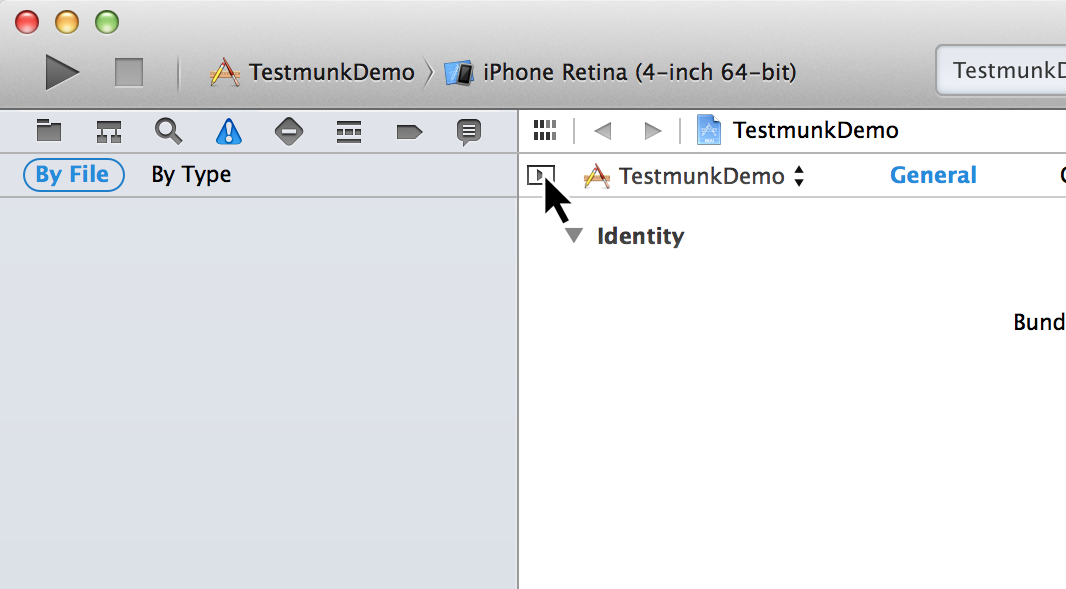
- Right click your target in the list of targets. If you do not see the list of targets, you need to press this button:
- From the dropdown menu, select “Duplicate”.
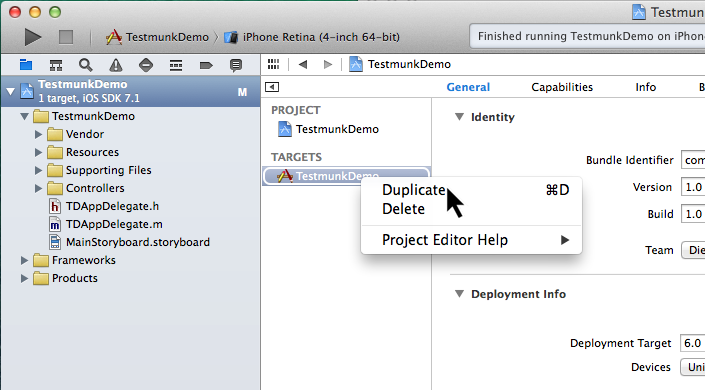
- Rename the new target from “TestmunkDemo copy” to “TestmunkDemo-tm” by clicking on it and pressing Enter.
- Click in the toolbar where it says TestmunkDemo, and from the dropdown menu, select “Manage Schemes”.
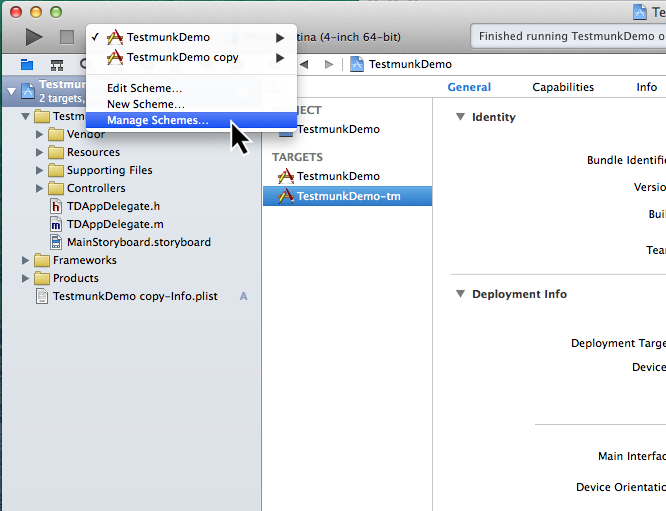
- Rename the new scheme from “TestmunkDemo copy” to “TestmunkDemo-tm” by clicking on it and pressing Enter. Then press OK.
- Click on “Build Settings” and under Packaging set the “Product Name” to “TestmunkDemo-tm”

Hint
You want to build your app with the Calabash framework only if you are building your app for testing purposes. That is why we are setting up a target specifically for running tests.
Why are we creating a new build target?
Link the Calabash framework
- Open terminal and run
calabash-ios downloadto download the latestcalabash.frameworkfile. - Run the command
open .in Terminal. - Drag
calabash.frameworkfrom its current location to the project’s Frameworks folder in Xcode.
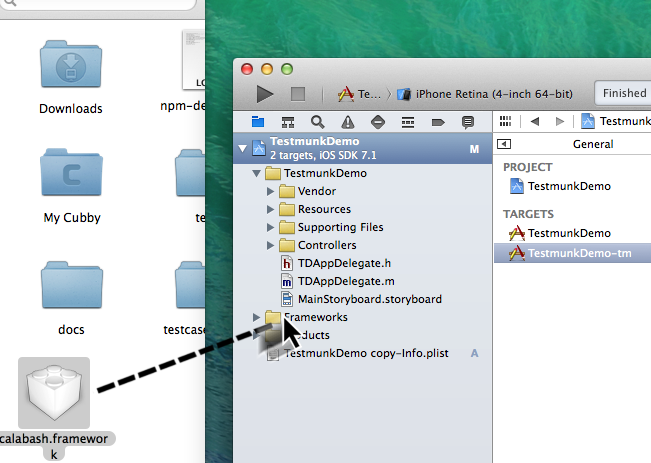
- In the pop up window that appears, select Copy items into destination group’s folder (if needed) and make sure “TestmunkDemo-tm” is the only selected target.
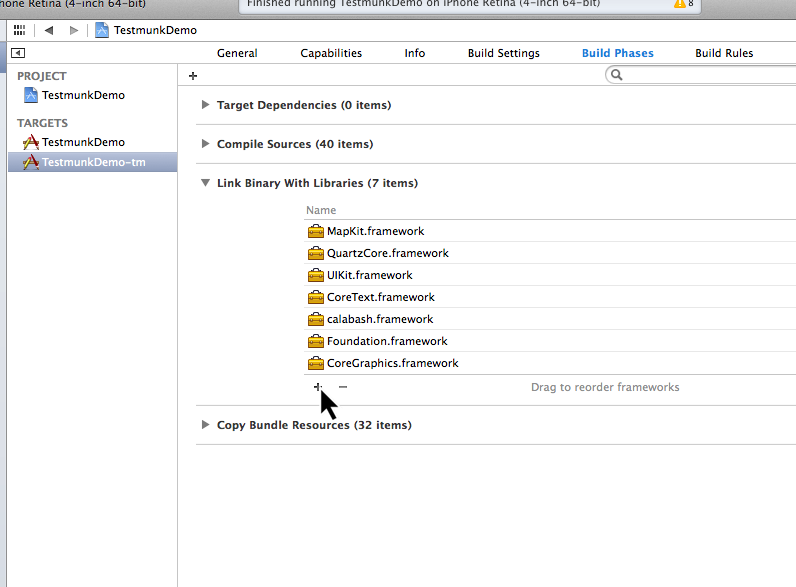
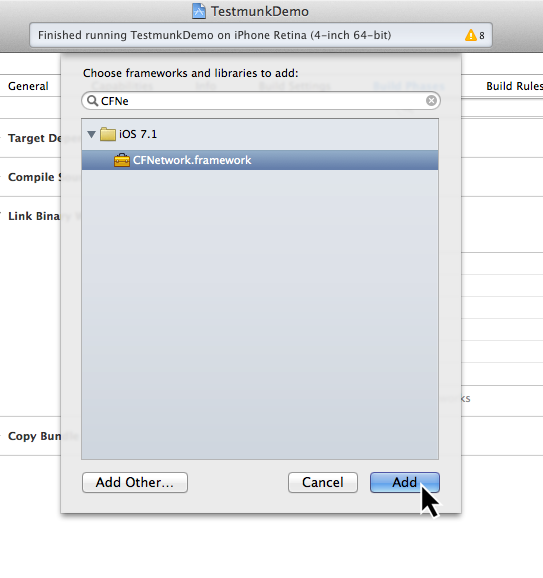
- Select the “TestmunkDemo-tm” target, go to “Build Phases”, and in the “Link Binary With Libraries” section, make sure that
calabash.frameworkis present. Link the CFNetwork framework so that Calabash can communicate with your app, by clicking ‘+’, and selectingCFNetwork.framework.
Configure the build target
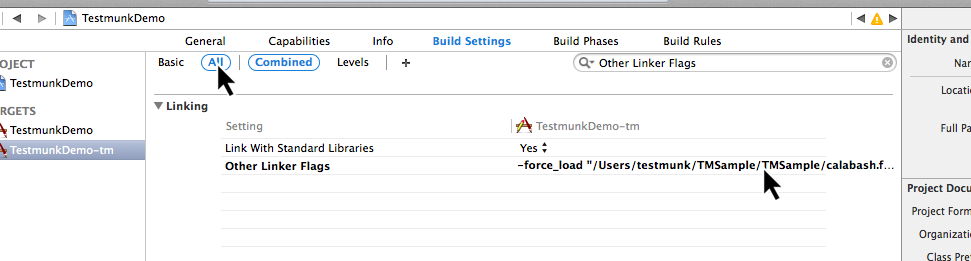
- Select “Build Settings”
- Change the filter from “Basic” to “All”
- Make sure that “Other Linker Flags” contains:
-force_load "$(SRCROOT)/calabash.framework/calabash" -lstdc++
Test the configuration
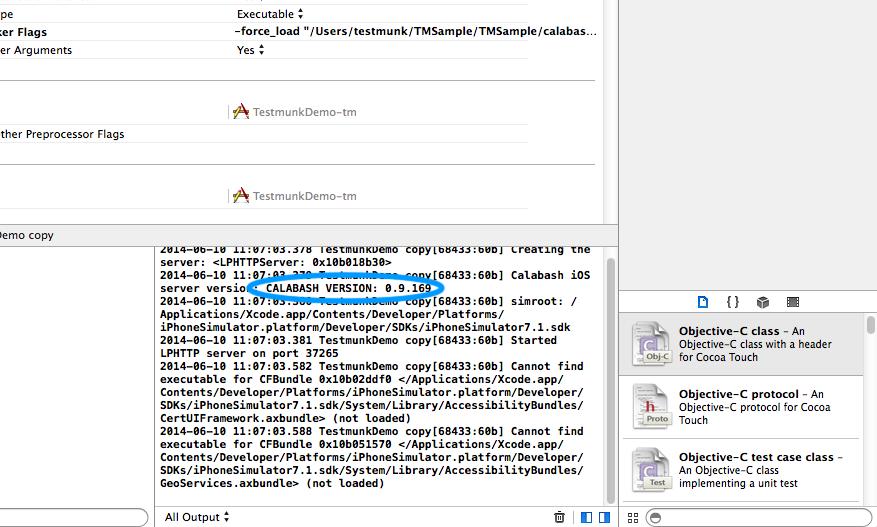
Build and run your application on the simulator. You should be getting console output similar to this:
2014-05-30 16:08:07.882 TestmunkDemo-tm[3088:60b] Creating the server: <LPHTTPServer: 0xa0970d0>
2014-05-30 16:08:07.883 TestmunkDemo-tm[3088:60b] Calabash iOS server version: CALABASH VERSION: 0.9.169
2014-05-30 16:08:07.889 TestmunkDemo-tm[3088:60b] Started LPHTTP server on port 37265
2014-05-30 16:08:08.810 TestmunkDemo-tm[3088:1903] Bonjour Service Published: domain(local.) type(_http._tcp.) name(Calabash Server)
Preparing testcases
After your Xcode project has been set up, and you have ran your app on the simulator for the first time, you are ready to make and run your own testcases.
Inspect app for elements
Accessibility Inspector
To be able to test, you need to have a way to reference different elements in your application. iOS devices have been setting new, improved usability standards for impaired users, since Accessibility functions help them navigate through the app. These Accessibility functions come in very handy for test automation. Test cases become more robust and easier to maintain. You can enable the Accessibility Inspector by starting the Simulator, then going Settings -> General and setting Accessibility Inspector to ON.
Once the Accessibility Inspector is enabled, you can switch between two modes, inspection and navigation. If the Accessibility Inspector is minimized, then the app is in navigation mode. This means that you can tap on buttons to perform actions.
However, once you click on the X button, the window enlarges – then you are in inspection mode. Now clicking on the button will show its accessibility details.
To go back to the navigation mode, simply click the X again to minimize the Accessibility Inspector.
Calabash console
A more advanced way of inspecting elements on the view is using the Calabash console to see a list of the app’s visible elements. Inside the folder you downloaded, go to TMSample/ and run this Terminal command:
$ calabash-ios console
> start_test_server_in_background
This will start our test application in the iOS simulator. then enter:
> query("*")
You should see a list of all visible elements.
[
    [ 0] {
              "class" => "UIWindow",
                 "id" => nil,
               "rect" => {
            "center_x" => 160,
                   "y" => 0,
               "width" => 320,
                   "x" => 0,
            "center_y" => 284,
              "height" => 568
        },
              "frame" => {
                 "y" => 0,
             "width" => 320,
                 "x" => 0,
            "height" => 568
        },
              "label" => nil,
        "description" => "<UIWindow: 0xb26fc60; frame = (0 0; 320 568); gestureRecognizers = <NSArray: 0xb2723a0>; layer = <UIWindowLayer: 0xb271d50>>"
    },
    [ 1] {
              "class" => "UIView",
                 "id" => nil,
               "rect" => {
            "center_x" => 160,
                   "y" => 0,
               "width" => 320,
                   "x" => 0,
            "center_y" => 284,
              "height" => 568
        },
              "frame" => {
                 "y" => 0,
             "width" => 320,
                 "x" => 0,
            "height" => 568
        },
              "label" => nil,
        "description" => "<UIView: 0x9eb3610; frame = (0 0; 320 568); autoresize = RM+BM; layer = <CALayer: 0x9eb37e0>>"
    },
    ...

]
Writing testcases
We have installed a feature folder in your project folder. Inside the folder you downloaded, go to TMSample/features/, and open the myfirst.feature file to write your testcases. You can ignore the folders step_definitions and support at this point.
The my_first.feature file is structured in the following way:
# Scenario name
Scenario: Login
  Given I am on the Welcome Screen # Teststeps
  Then I touch the "Email" input field
  Then I use the keyboard and type "test@testname.com"
  Then I touch the "Password" input field
  Then I use the keyboard and type "testmunk"
  Then I touch "SIGN IN"
  Then I wait
  Then I should see "Hello world"
Hint
For writing testcases, we recommend using Sublime Text 2 with the Cucumber syntax highlighting plugin.
Text editor suggestion
You can write as many testcases as you want in your myfirst.feature file. Don’t delete the feature title line, since it is needed for a successful execution of your testcase.
Good to know: Ensure that each testcase starts from the beginning. We call it testcase independency. When you run your app on our devices, we clear the app data before each testcase. So, if your app always starts with the login process, you will need to have teststeps that cover the login process at the beginning of each testcase. Testcase independency makes your testcases more robust, and it means every testcase can be tested independently.
Our teststep library can come in handy as a reference as you’re writing your testcases.
If you run your app over our device lab, we automatically take screenshots after each teststep – you don’t need to worry about it at all.
Calabash Ruby API
Calabash offers a Ruby API that we support for defining special teststeps.
A new teststep is defined in the following way:
# Define a regular expression to catch the step
Then(/^"(.*?)" radio button should be selected$/) do |arg1|
  # Use calls to the Calabash API to get information
  if(!query("RadioButton text:'#{arg1}'", :checked).first())
    # Act on that information
    fail("The radio button with text #{arg1} should be selected")
  end
end
A teststep is considered succesful if the execution of its codeblock runs with neither explicit fails nor uncaught errors.
A nice way to try the different commands on this API is to run the Calabash console and test them.
Useful methods
This are some useful functions that the Calabash API provides. You can see more about them on the Calabash GitHub documentation.
query(uiquery, *args)
Query returns an array with the views on the screen that match it.
> query("UIButton")

[
    [0] {
              "class" => "FUIButton",
                 "id" => nil,
               "rect" => {
            "center_x" => 160,
                   "y" => 194,
               "width" => 300,
                   "x" => 10,
            "center_y" => 216,
              "height" => 44
        },
              "frame" => {
                 "y" => 194,
             "width" => 300,
                 "x" => 10,
            "height" => 44
        },
              "label" => "SIGN IN",
        "description" => "<FUIButton: 0x9f909e0; baseClass = UIButton; frame = (10 194; 300 44); opaque = NO; layer = <CALayer: 0x9f90bf0>>"
    }
]
Each result is a Ruby hash map object.
> query("UIButton").first.keys

[
    [0] "class",
    [1] "id",
    [2] "rect",
    [3] "frame",
    [4] "label",
    [5] "description"
]

> query("UIButton")[0]["label"]

"SIGN IN"
wait_for_elements_exist(elements_arr, options={})
Waits for all queries in the elements_arr array to return results before continuing the test.
wait_for_elements_exist( ["button marked:'OK'", "* marked:'Cancel'"], :timeout => 2)
touch(uiquery, options={})
Touches the first result of the query uiquery.
touch("UIButton index:0")
touch(query("UIButton"))
Running testruns
General
Testmunk iOS enables you to run your testcases on:
- the virtual simulator
- on a variety of iOS devices with different OS versions in the testmunk device lab.
Running locally on the simulator
Inside the folder you downloaded, go to TMSample/, where the Xcode project resides, and run the following command:
$ cucumber -v
That will initiate the testruns on your simulator.
Hint
The -v argument launches Cucumber in verbose mode, which means that it will print more detailed information to the console while running. We run it this way to know exactly what went wrong or right with the testing.
Why ‘-v’?
Danger
If you are getting an error that reads tool 'xcodebuild' requires Xcode, but active developer directory ..., then open Xcode, and go to Xcode > Preferences > Locations and in the Command Line Tools dropdown menu select Xcode.
‘xcodebuild’ error
Danger
If cucumber -v dosen’t work, try this fixes one at a time:
- Manually run your app on the simulator through Xcode, and then close and stop it.
- Make sure Xcode is not executing any projects at the time.
- Have only one instance of Xcode open, with the project you are trying to run, and hte scheme you want to build selected.
- Make sure you have the same version of Calabash in your Terminal tool and the framework you are linking in your project.
- Choose the Reset content and settings option in your iOS simulator.
Other errors
Running locally on a device
If you want to run a test locally in your device, you need to:
Connect your device to your computer with a USB cable
Connect your device and computer to the same LAN
Deploy the app to your device using Xcode, making sure to deploy the target that has the Calabash framework linked to it (a.k.a. the ”...-tm” target).
cdto the directory that contains your.appfile and yourfeaturesfolderUse this command:
$ RESET_BETWEEN_SCENARIOS=1 DEVICE_ENDPOINT=http://192.168.1.43:37265 DEVICE_TARGET=97da4f58c9a95b7286c760372fd3d27be85a17cf BUNDLE_ID=com.sample.TestmunkDemo-copy APP_BUNDLE_PATH="TestmunkDemo.app" cucumber -v
Make sure to replace
192.168.1.43with your device’s LAN IP address,97da4f58c9a95b7286c760372fd3d27be85a17cfwith your device’s UDID,com.sample.TestmunkDemo-copywith your application’s Bundle Identifier, andTestmunkDemo.appwith your.appfilename.
Hint
The RESET_BETWEEN_SCENARIOS=1 variable will make your tests start with a fresh install of your application. We recommend this method to keep tests independant, as opposed to relying on each other, to make them easier to debug. Testmunk servers will always reinstall your app after every testcase.
What is ‘RESET_BETWEEN_SCENARIOS=1’?
Danger
If you are getting an error that reads tool 'xcodebuild' requires Xcode, but active developer directory ..., then open Xcode, and go to Xcode > Preferences > Locations and in the Command Line Tools dropdown menu select Xcode.
‘xcodebuild’ error
Danger
If the command dosen’t work, try this fixes one at a time:
- Manually run your app on the simulator through Xcode, and then close and stop it.
- Make sure Xcode is not executing any projects at the time.
- Have only one instance of Xcode open, with the project you are trying to run, and the scheme you want to build selected.
- Make sure you have the same version of Calabash in your Terminal tool and the framework you are linking in your project.
Other errors
Running on multiple iOS devices
In order to run your testcases on testmunk’s devices and see a report with your test results and screenshots, simply create an account, upload your IPA file and testcases.
Hint
To export the IPA file for your app, open your Xcode project, make sure to select the ”...-tm” scheme and “iOS Device” as your target device. Then, in the title bar and go to Product > Archive. In the Archives window that pops up, press the Distribute... button, select Save for Enterprise or Ad Hoc Deployment, choose the Provisioning Profile you sign your app with, and export the file. Leave the Save for Enterprise Distribution checkbox unchecked.
How do I export my IPA file?
Updating Calabash
For your tests to run in both your machine and the Testmunk servers, you need to have the same version of Calabash as we do (currently it is 0.9.169). You can achieve this by updating your Calabash installation.
In order for your tests to run, you need to have the same version of Calabash in both the Calabash Ruby gem and the Objective-C framework you link with the ”...-tm” build of your iOS application.
Check the version of Calabash you have installed
Framework version
Run in the simulator the app for which you want to check the version, and then run this commands in Terminal:
$ calabash-ios console # this opens the Calabash console
> server_version['version'] # this queries the Calabash server running in your application for its version
Update process
First, download the updated Ruby gem by running:
$ gem install calabash-cucumber
Then, for each Xcode project containing a build target with the Calabash framework, do this:
- In Terminal,
cdinto the folder that contains thecalabash.frameworkfile, and run this command:
$ calabash-ios download
- Open the project in Xcode.
- Press Shift + Option + Command + K to clean your Xcode project.
- Delete the app from any iOS devices or simulators that have it.
- Rebuild your app.
- Go through the commands in the “Check the version of Calabash you have installed” section above to make sure your framework was properly updated.
Hint
You can also check the verison of your app’s Calabash framework by looking at the console output in Xcode.
Alternative method for checking framework version